 |
|
 18-03-2013, 10:41 PM
|
#81
|
|
Registered User
Country: uk
Location: liverpool
Interests: sailing ribing
Boat name: llyn raider
Boat make: 7m xs rib
Engines: 200 merc opti
Cruising area: n wales
Join Date: Nov 2006
Location: liverpool
Posts: 215
|
bump, any updates?
__________________
__________________
I have a short attention span,  So i need at least two projects/basket cases at all times 
|

|

|
|
28-06-2013, 11:53 PM
|
#82
|
|
Registered User
Join Date: May 2009
Posts: 496
|
Quote:
Originally Posted by andyxs

bump, any updates?
|
The cougar has been on the back burner for quite some time due to other detractions and commitments. Last Sunday uncovered the old girl, separated and sorted all the parts ready to start fitting up again. First out of the box was the trough hull led transom lights, the original LED insert was white 1 watt, so turned up some new inserts and mounted the new 20 watt blue LED chips. The chips are flush mounted and it is very important to use heat sink compound as the chips can be very easily damaged if the go over temperature.
OK bit gimmicky but I just love this clip and the blue LED effect.
The old insert is to the left and the new 20 watt to the right
__________________
|
|
|
|
|
29-06-2013, 12:18 AM
|
#83
|
|
Registered User
Join Date: May 2009
Posts: 496
|
Next out of the box was a PALL 316 stainless filter I found in a scrapyard and paid a tenner for a pair of them, one of these would be great to convert to an engine filter. Two days later finished, polished and fitted.
The function of this unit is to remove water, remove any air from the system and filter the fuel before it is fed to the engine. Trapped air in the fuel system of modern common rail diesel engine is a nightmare.
Fuel from the tank lift pump enters bottom left. Any water in the fuel being heaver than diesel sinks to the bottom through perforated baffles and collects in the bottom of the filter bowl. A small sight level window fitting allows visual inspection for collection of water. A drain tap is fitted to the bottom for emptying any water. At the top of the filter is a vent which joins the engine fuel return to prevent trapped air in the filter, also another sight gauge is fitted to the top of the filter to make sure the filter is full of fuel. Bottom left hose is joined to the center of the filter which then feed the engine.
|
|
|
|
|
29-06-2013, 12:28 AM
|
#84
|
|
Registered User
Join Date: May 2009
Posts: 496
|
Next out of my boxes was the new hydraulic hoses which connect from the trough transom fitting to the hydraulic steering rams. The hoses are high pressure rubber with stainless ends, I was advised by other boat builders that rubber is better than steal braided as the have a tendency to fray in this application.
|
|
|
|
|
29-07-2013, 01:20 AM
|
#85
|
|
Registered User
Join Date: May 2009
Posts: 496
|
Made a stainless cable shifter as the original Bravo one was mounted on the exhaust of the Mercruiser engine. Installed the cross member and engine mounts ready for final installation of the engine.
|
|
|
|
|
29-07-2013, 01:30 AM
|
#86
|
|
Registered User
Join Date: May 2009
Posts: 496
|
Cougar engine install
The engine is now installed. Had a bit of a nightmare with the shimming of the engine mounts but got it spot on in the end, the alignment tool just glides in and out. Started fabricating the charge cooler, exhaust and coolant pipes.
|
|
|
|
|
30-07-2013, 02:04 PM
|
#87
|
|
Registered User
Location: Scotland
Interests: Hole maker
Boat make: Humber Ocean Offshore
Engines: KAD 300/DPX
Join Date: Mar 2004
Location: Scotland
Posts: 958
|
Nice to see you back on the case.  But those steering ram transom brackets still worry me! You could do with a pad welded behind the pivot so it leaned against the transom to prevent bending from the ram load and it would also stiffen the flanges so preventing twisting...just a thought.
__________________
JW.
|
|
|
|
|
31-07-2013, 12:20 AM
|
#88
|
|
Registered User
Join Date: May 2009
Posts: 496
|
Quote:
Originally Posted by jw.
Nice to see you back on the case. But those steering ram transom brackets still worry me! You could do with a pad welded behind the pivot so it leaned against the transom to prevent bending from the ram load and it would also stiffen the flanges so preventing twisting...just a thought. |
Hi JW
thanks for your comments. I have given some thought to your suggestion and it may be something come back to later. Developing the idea of a pad further there is no reason why it cant tie into the overhung bolts, as a secondary bracket. Another idea is if the transom wood is dry I could chem fix studding in. As silly as it sound I have found this very successful in the past for other applications when using wood.
There is also another train of thought, and that is that I have seen some race boats that have single drive and single external ram. Now just as an example if I had both my brackets on one side with all six bolts although it both plates although it is overhung it would look right. In effect with a twin setup ram single drive, the load to each ram should be halved. So in effect its no weaker than having a single ram with both brackets on one side witch would probable be OK.
Apart form that I have been busy today making the trough transom exhaust, and started a support bracket for the exhaust.
|
|
|
|
|
31-07-2013, 08:47 PM
|
#89
|
|
Registered User
Join Date: May 2009
Posts: 496
|
Finished the exhaust system today.
|
|
|
|
|
05-08-2013, 09:48 PM
|
#90
|
|
Registered User
Join Date: May 2009
Posts: 496
|
Manged to find an old sheet metal forming roller and made some new rollers to swage the end of the engine cooling pipes and charge cooler pipes. Swaging 1mm walled stainless tube is very hard work, but last thing I wanted was hoses blowing off.
Polished all the pipes and fitted them. The engine is now fully installed with only the electric to connect up.
|
|
|
|
|
05-08-2013, 11:33 PM
|
#91
|
|
Registered User
Country: uk
Location: liverpool
Interests: sailing ribing
Boat name: llyn raider
Boat make: 7m xs rib
Engines: 200 merc opti
Cruising area: n wales
Join Date: Nov 2006
Location: liverpool
Posts: 215
|
that is some top quality engineering!
__________________
I have a short attention span, So i need at least two projects/basket cases at all times
|
|
|
|
|
26-08-2013, 12:42 AM
|
#92
|
|
Registered User
Join Date: May 2009
Posts: 496
|
Not much to show for the past few weeks as I have been wiring everything up. Nice to see all the sytems comming to life.
Had the engine running but only at idle as the guys who supplied the ECU are really tied up for the next couple of weeks and I need to program the Throttle pedal in as it is fly by wire.
Had a bit of a nightmare last Sunday, when I fitted the leg and started the engine I had a really bad knocking from the drive. Sounded like the UJ's. I thought I had miss measured and the splined shaft from the drive and was located to far in the cushy drive attached to the flywheel.
So removed the leg again, cleaned all the grease of the splines and marked the splines shaft with engineers marking blue. Assembled it all back together again, ran the engine and removed the drive again. Everything was exactly as measure and the splined shaft was exactly where it should be be so reassembled it.
Now really worried that there was something wrong with the drive, did a search on the forum for Bravo one gear chatter. Found a few links and apparently its normal and is backlash on the gears causing gear chatter and also more noisy as its being run out of the water.
http://boatmad.com/forum/showthread....t=gear+chatter
"They still suffer with the horrid backlash 'chatter' when in neutral and at idle, but over the 8 years I've learned to live with that and it doesn't appear to do any harm.."
So apparently its normal. Hey ho wasted best part of a day. 
Started to build the suspension for the front seats today. Built a jig using old wood I had lying around and plastic pipe clips to locate the tubing. Wanted the frames to be light and strong so bought some 1" titanium tube. Its around the same weight as aluminum but similar strength to 316 stainless.
If you think 316 stainless is hard to work with, titanium is a Ba****rd to work in comparison. The tube is annealed and I used a electricians conduit bender to bend it, bloody hard to bend.
Nice thing about titanium is it lovely to weld.
|
|
|
|
|
06-09-2013, 08:54 PM
|
#93
|
|
Registered User
Join Date: May 2009
Posts: 496
|
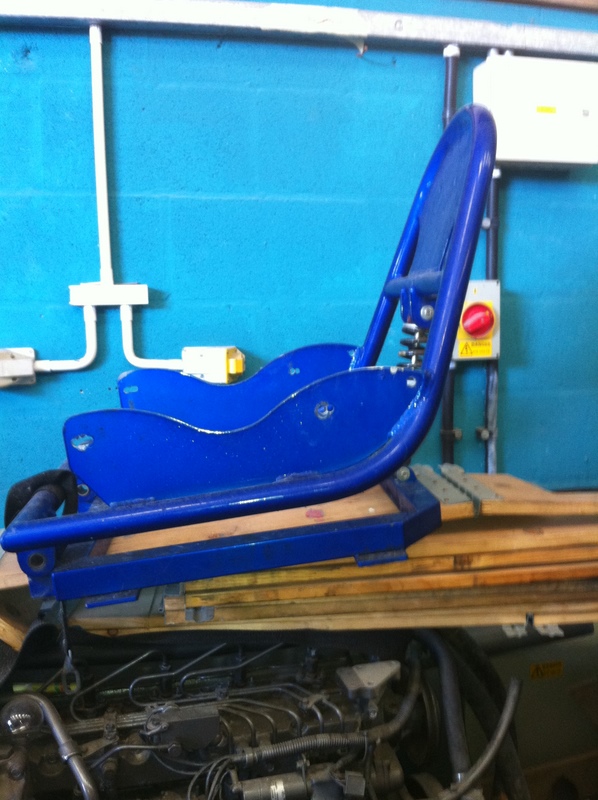
Suspension seats are nearly finished.
I have to admit that the inspiration for the suspension seats came from the Panther P1 race boats which are reported as working quite well (blue frames below).
I lengthened the swinging radius pivot points to reduce the tilting effect of the rear of the seat on full travel. The front brackets are bolted to the floor and have 6 position holes with quick release Advel pins. The ones in the picture are temporary as I have ordered some 'T' handle ones in stainless's from the states. The bottom of the suspension unit will attache to a capping bolted to the top of the cockpit cross member, so no suspension sub frames or seat adjustment sliders will be necessary, so reducing the weight of seat suspension unit's.
The shocks are Yamaha R6 which have spring pre load, compression and rebound damping that are all adjustable. As Yamaha have a share in Ohlins, I suspect that the a shock is an Ohlins designed shock anyway. I have re sprung them with 200Lbs springs which so far seems to be a good gestamate.
The frames have turned out to be quite rigid as are the carbon kevlar seats. I am hoping that when bolted together they will form a very rigid structure, a bit like a space framed monocoque chassis.
|
|
|
|
|
07-09-2013, 10:14 AM
|
#94
|
|
Registered User
Country: Guernsey Channel Isles
Location: West Coast
Occupation: Hotelier
Interests: Powerboat racing
Boat name: Vodkatini,Cap Camarat,Easy RiderSuper Rider & Hirrondelle
Boat make: Phantom 21,Jeaneau 925 Avenger19.Lorne Campbell Slipstream Tremlett 21.Tigershark 21
Engines: Volvo 5 litre,Merc 115 Tower,Twin 250 Suzukis and 145 Mercruiser LX
Cruising area: Channel Islands and French coast
Join Date: Jan 2009
Location: West Coast
Posts: 612
|
Now that truly is a lovely bit of engineering and I hope it smoothest out any bumps that you might feel. Shock mitigation has come a long way since we used to fix seats on Landrover mounts in our old boats !
Interesting design that Wavesoft do wit fully sprung device that seems to work well too.
When you launching her ?
__________________
Guernsey - The home of offshore powerboat racing
|
|
|
|
|
08-09-2013, 07:04 PM
|
#95
|
|
Registered User
Location: West Coast of Norway
Occupation: naval architect
Interests: surface piercing props, stepped hulls, air entrapment hulls
Boat name: none
Boat make: PetterTintorera
Engines: Yamaha 90
Cruising area: West Coast of Norway
Join Date: Sep 2005
Location: West Coast of Norway
Posts: 888
|
Very nice work again, interesting thread to follow.
Do you know if this somethining you can buy?
|
|
|
|
|
08-09-2013, 08:24 PM
|
#96
|
|
Registered User
Join Date: May 2009
Posts: 496
|
[QUOTE=Scand;239576]Very nice work again, interesting thread to follow.
Do you know if this something you can buy?
Hi Scand
The blue seat suspension unit picture is from the P1 Super stock Panther race series boats. Not sure who the importer is in the UK but I'm sure someone on here will know. Spares are available for the Panthers so so could probably be ordered through the importer.
Regards David
|
|
|
|
|
08-09-2013, 08:38 PM
|
#97
|
|
Registered User
Join Date: May 2009
Posts: 496
|
Wanted a hand rail for the transom so I have something to grab hold to if I want to look over the back of the boat. Also have a few friends who water ski so wanted fit a towing eye as well, so thought I would combine the two similar to the Yamaha jet ski ones
So orders a 18in hand rail from flee bay, turned up some additional support posts and bent up a hook. Drilled some holes in a piece of aluminum to use as a jig whilst Tig welding them it all together. Polished and fitted it 
|
|
|
|
|
08-09-2013, 09:17 PM
|
#98
|
|
Registered User
Join Date: May 2009
Posts: 496
|
Quote:
Originally Posted by Big Dutch
Now that truly is a lovely bit of engineering and I hope it smoothest out any bumps that you might feel. Shock mitigation has come a long way since we used to fix seats on Landrover mounts in our old boats !
Interesting design that Wavesoft do wit fully sprung device that seems to work well too.
When you launching her ?
|
Got a few small jobs left to do, make cabin door with built in foot well. Lino the cockpit and fit the seats. Carpet line the cabin. Final fit the fuel tank. Run cables from hand and foot throttle to fly by wire throttle sensor. Tidy all the wiring.
So may be about a month left, might dip it in the Thames for a trial run before heading out to sea.
|
|
|
|
|
21-09-2013, 12:37 AM
|
#99
|
|
Registered User
Join Date: May 2009
Posts: 496
|
Had the backs of the carbon seats clear lacquered as they has minor scratches.
The new seat frames I had bead blasted which gives a conformal sating finish. Refitted the original seat covers as they are serviceable for the time being, may be at a later date will have them reupholstered. Also fitted non slip lino to the floor of the cockpit front and rear.
Had the engine running tonight for the first time in the boat, sounds awesome for a diesel. Throttle response and sound is more like a petrol engine than diesel. Because of the common rail there is not the usual diesel knocking at idle, in fact the gear chatter from the Bravo drive is louder than the engine I suppose it something I will just have to learn to live with.
Will post a video link soon of the engine running.
|
|
|
|
|
21-09-2013, 01:58 PM
|
#100
|
|
Registered User
Country: UK
Location: Surrey
Occupation: Motorsport Development inc Engine Managment
Boat make: 21ft
Engines: Various
Cruising area: Solent / Kent / Cornwall
Join Date: Oct 2011
Location: Surrey
Posts: 375
|
Very nice indeed!
__________________
|
|
|
|
|
|
 Posting Rules
|
You may not post new threads
You may not post replies
You may not post attachments
You may not edit your posts
HTML code is Off
|
|
|
|
 » Recent Threads
 |
|
|
|
|
|
|
|
|
|
|
|
|
|
|
|
|
|
|
|
|
|
|
|
|
|
|
|
|
|
|
|
|
|
|
|
|
|
|
|
|
|


 Linear Mode
