 |
|
 07-10-2015, 11:41 AM
|
#1
|
|
Thundercat guy
Country: Scotland
Location: Isle of Lewis
Occupation: Skipper
Boat make: Thundercat
Engines: Yamaha 70ces
Join Date: Apr 2014
Location: Isle of Lewis
Posts: 561
|
Yam 90 Velocity stacks
Anyone know where to get velocity stacks for Yamaha 90 carbs?
Think they're made by Keihin
__________________
|

|

|
|
08-10-2015, 08:15 PM
|
#2
|
|
Registered User
Country: Blighty
Location: Essex
Interests: Staying Alive
Boat make: Crusader 16
Engines: Merc B/Port 2.4 EFI
Cruising area: Back Garden
Join Date: Sep 2015
Location: Essex
Posts: 23
|
Velocity Stack
Good Old E-Bay. Type in Velocity Stack. Check the throat size of your carbs, remember that the engine is around 1200cc from memory. The air box is off the carbs ( good old 300rpm hop up ). Measure the distance from the cowl inside to the start of the carb throat and make sure that you leave at least 30mm gap once the stack is fitted ( this will give you a idea of the length ). You may need to have 3 adapters made up in alloy or plastic to get a really neat attachment.
look at DANST Engineering's shop on E-Bay, they will be able to make the adapters as well.
" the throttle goes both ways" it's just the soft parts measure.
Crusader 16 2.4 B/Port EFI.
__________________
|
|
|
|
|
08-10-2015, 08:47 PM
|
#3
|
|
Thundercat guy
Country: Scotland
Location: Isle of Lewis
Occupation: Skipper
Boat make: Thundercat
Engines: Yamaha 70ces
Join Date: Apr 2014
Location: Isle of Lewis
Posts: 561
|
thanks,
I'm most likely going to design my own and have them 3D printed, I'm just sure I saw a guy that had a set online. I've designed a set for the tohatsu 50, which also fit yam 70 and I had a set made by a guy in Aus. I'm just thinking of putting yam 90 carbs on the 70CES and the mounting for velocity stacks is different
|
|
|
|
|
09-10-2015, 08:31 AM
|
#4
|
|
Registered User
Engines: Yamaha 140hp, modded Yamaha 90hp
Join Date: Mar 2004
Posts: 161
|
I was looking to do this for my Yamaha 90 and drew a blank. In the end I put the carbs on a lathe and radiused the intakes of the carbs themselves.
|
|
|
|
|
09-10-2015, 10:16 AM
|
#5
|
|
Thundercat guy
Country: Scotland
Location: Isle of Lewis
Occupation: Skipper
Boat make: Thundercat
Engines: Yamaha 70ces
Join Date: Apr 2014
Location: Isle of Lewis
Posts: 561
|
Hmm ok. I think I'll design a set, do you reckon there's a market for them? At a guess I think they'd be around £100 for a set of 3
|
|
|
|
|
09-10-2015, 05:49 PM
|
#6
|
|
Registered User
Country: Blighty
Location: Essex
Interests: Staying Alive
Boat make: Crusader 16
Engines: Merc B/Port 2.4 EFI
Cruising area: Back Garden
Join Date: Sep 2015
Location: Essex
Posts: 23
|
Velocity Stacks
R&D first, then you can say that these components give "X" performance gain ! Then you may have a market niche. Have a word with Hydro-Tech in Missouri USA.
From experience run at 30 to 1 not 50 to 1 and aim for 6750rpm WOT, never pushed a rod out or "bit" the pistons of my 85 Yam. Used to go to 7500 on my 85 Suzuki but it was underwritten by them ! These two Jap triples ruled the HP bracket, rated at the "Prop" not F/Wheel.
Ever tried to get a OMC F19S, big bucks if you can get hold of one, but you will just kill the opposition with one of those ?
|
|
|
|
|
09-10-2015, 11:48 PM
|
#7
|
|
Registered User
Engines: Yamaha 140hp, modded Yamaha 90hp
Join Date: Mar 2004
Posts: 161
|
If you design a set remember that there are three different airbox bolt patterns for these carbs. You could probably make a set that would fit both types of round bowl carbs but not sure about the square bowl ones.
The 85 had the airbox held to the carbs by three bolts, the later 90 was held by two bolts in a different bolt pattern - both these carb types are identical internally and the same size Venturi. Then the square bowl carbs were introduced.
|
|
|
|
|
10-10-2015, 11:05 AM
|
#8
|
|
Thundercat guy
Country: Scotland
Location: Isle of Lewis
Occupation: Skipper
Boat make: Thundercat
Engines: Yamaha 70ces
Join Date: Apr 2014
Location: Isle of Lewis
Posts: 561
|
Quote:
Originally Posted by Drag Racer

R&D first, then you can say that these components give "X" performance gain ! Then you may have a market niche. Have a word with Hydro-Tech in Missouri USA.
From experience run at 30 to 1 not 50 to 1 and aim for 6750rpm WOT, never pushed a rod out or "bit" the pistons of my 85 Yam. Used to go to 7500 on my 85 Suzuki but it was underwritten by them ! These two Jap triples ruled the HP bracket, rated at the "Prop" not F/Wheel.
Ever tried to get a OMC F19S, big bucks if you can get hold of one, but you will just kill the opposition with one of those ?
|
I'll probably design them to look like most velocity stacks but with and additional radius at the intake.
I don't have a yam 90, but a 70CES which I'll probably put the 90 carbs on it.
Reading online it looks like it's safe to go upto 7800 rpm. I'll be rebuilding the powerhead this winter and welding the crank while it's apart. I've also got a billet cylinder head on the way, the first of for a yam 70 so I'll be the guinea pig for that. Should hopefully help it rev a bit more. I've been advised to run 32:1 for high RPM.
I don't race, just for fun, the boats are rated to max 50hp, but the weight difference between a 50 short shaft and the 70ces is minimal.

Quote:
Originally Posted by Phantom 19
If you design a set remember that there are three different airbox bolt patterns for these carbs. You could probably make a set that would fit both types of round bowl carbs but not sure about the square bowl ones.
The 85 had the airbox held to the carbs by three bolts, the later 90 was held by two bolts in a different bolt pattern - both these carb types are identical internally and the same size Venturi. Then the square bowl carbs were introduced.
|
Ah ok. Do you know when the square bowl kind was introduced? I think my grandpas boat has a 2005 ish yam 90 which is square bowl.
|
|
|
|
|
12-10-2015, 09:06 AM
|
#9
|
|
Jason
Country: UK
Location: Exmouth - Devon
Occupation: RN
Join Date: Jun 2014
Location: Exmouth - Devon
Posts: 41
|
Do you have some for your 70 carbs?
__________________
Mob - 07506762817
|
|
|
|
|
12-10-2015, 09:14 AM
|
#10
|
|
Thundercat guy
Country: Scotland
Location: Isle of Lewis
Occupation: Skipper
Boat make: Thundercat
Engines: Yamaha 70ces
Join Date: Apr 2014
Location: Isle of Lewis
Posts: 561
|
Quote:
Originally Posted by Lehuray
Do you have some for your 70 carbs?
|
The ones pictures above fit both tohatsu 50 and yamaha 70 carbs (I'm assuming also yam 50). I've run both on my modified tohatsu 50, though I won't get a chance to do some proper testing until next year.
On my CES there was a bulge in the lower cowling which would get in the way of the stacks, which I've cut out but the carbs are closer to the top cowl on the 70ces so they need to be a bit shorter. I'm having a slightly shorter set 3D printed by a friend of mine in Aus just now for the 70.
|
|
|
|
|
12-10-2015, 01:36 PM
|
#11
|
|
Registered User
Location: Scotland
Interests: Hole maker
Boat make: Humber Ocean Offshore
Engines: KAD 300/DPX
Join Date: Mar 2004
Location: Scotland
Posts: 958
|
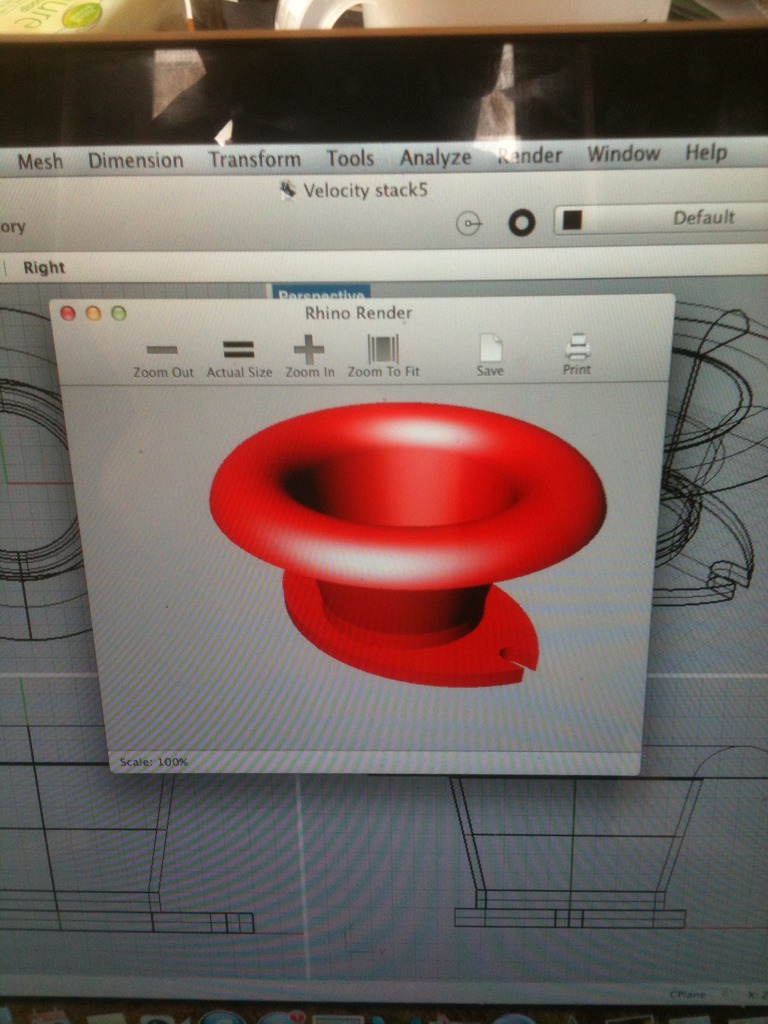
A good deal of the air entering the stack will come from behind it. I see from your drawing that you have the rolled edge approximately 180°, it would be advantageous to have the rolled edge a full 360° or as near as you can manage. Also, keep the radius as large as possible. Inside the stack where the tapered section meets the flange you have a sharp corner, a radius at that point, again as big as possible, would be a benefit to flow.
Are you taking in to account the length of the inlet tract and so timing the pressure wave to work in your favour or are these simply to improve air flow?
__________________
JW.
|
|
|
|
|
12-10-2015, 09:26 PM
|
#12
|
|
Thundercat guy
Country: Scotland
Location: Isle of Lewis
Occupation: Skipper
Boat make: Thundercat
Engines: Yamaha 70ces
Join Date: Apr 2014
Location: Isle of Lewis
Posts: 561
|
Interesting stuff thanks, I'll get the next ones like that.
I wasn't trying to do the intake tract measurements, I found a calculator online for four stroke engines but nothing for 2 strokes (or at least nothing simple enough for me!). So these are just to improve the air flow.
|
|
|
|
|
12-10-2015, 10:45 PM
|
#13
|
|
Registered User
Country: Blighty
Location: Essex
Interests: Staying Alive
Boat make: Crusader 16
Engines: Merc B/Port 2.4 EFI
Cruising area: Back Garden
Join Date: Sep 2015
Location: Essex
Posts: 23
|
Mind Mangled Yet ?
The primary reason for the fitment of velocity stacks is to straighten the air before it enters the carb body. By fitting long or short stack lengths only changes the power point in your operating rev range. The intake track length is measured from the liner port to the entry end of the inlet tract "still with me", if you have the original air box fitted we now have a box plenum which we have to calculate the cube, divide this by the number of cylinders and add this number to the first bit above. After all this we come back to the above post from me. Remove the air box and you should see 300 + rpm extra, now add those really nice looking stacks you have designed which will straighten up the air before it enters the carb body and you are in the ball park. The above post has seen those sharp lines at the attachment point and yes they will upset the air flow but you may gain a slight flow benefit by having a very slight venturer pinch at this point which you have designed into the stack, just radius the sharp edges. Those 90 carbs must be Xmm bigger on bore size or why fit them ?
The cowl needs to be looked at seriously as they seal very well and the only place air gets in with any real volume is at the back hand pull handle / air intake. Rig a barometric pressure sensor inside the cowl, run her WOT if the pressure drops then your cowl breathing needs to be improved.
"Why are you having the crank welded ?"
|
|
|
|
|
13-10-2015, 11:13 AM
|
#14
|
|
Thundercat guy
Country: Scotland
Location: Isle of Lewis
Occupation: Skipper
Boat make: Thundercat
Engines: Yamaha 70ces
Join Date: Apr 2014
Location: Isle of Lewis
Posts: 561
|
Good information there, I have some reading to do!
I wondered if it would be beneficial to get more air into the cowl, on my tohatsu I had an angled vent, similar to those found in modern car dashboards. Some folk space up the rear cowl piece to act as a sort of scoop.
I'm welding the crank because I want to rev the engine past the usual RPM range, as these cranks and pressed together they need to be welded or else they lose their press, which either puts the engine out of timing or can blow them up. Doesn't give a performance gain as such, it just allows the engine to rev higher safely.
|
|
|
|
|
13-10-2015, 05:13 PM
|
#15
|
|
Registered User
Location: Scotland
Interests: Hole maker
Boat make: Humber Ocean Offshore
Engines: KAD 300/DPX
Join Date: Mar 2004
Location: Scotland
Posts: 958
|
Seumas, if you're going to weld the crank there is something else to check before you do that since you can't do anything about it once it's welded. Since the crank will be out of the engine it's worth checking its alignment, that is, ensuring both ends are perfectly aligned with each other. You might imagine this is obviously correct because it all bolts up into the engine without binding. Yours may be dead straight but you may get a surprise! It's worth checking. If you have the facility, or maybe someone locally has a lathe, you need to mount the crank between centres in a lathe and check with a dti for any runout on each end shaft. It can be corrected by tapping a crank web to cause the two halves to twist slightly, relative to each other, on the crank pin. Also, think carefully as how to go about the welding so as not to induce any twisting or bending caused by contraction during the welding process.
I think you should do some serious swatting re setting up 2 strokes and inlet/exhaust tuning theory before you embark on the actual modifications to your engine. It will be easy to put in a lot of work and end up with a poor result. But good luck with it!
__________________
JW.
|
|
|
|
|
13-10-2015, 05:54 PM
|
#16
|
|
Thundercat guy
Country: Scotland
Location: Isle of Lewis
Occupation: Skipper
Boat make: Thundercat
Engines: Yamaha 70ces
Join Date: Apr 2014
Location: Isle of Lewis
Posts: 561
|
that's a good idea thanks. Hopefully the shop that does the welding has the facility to check the crank. They were reluctant to weld the crank from my tohatsu 50 but did a great job.
I'm keeping the modifications relatively tame and not changing anything that can't be changed back. I'm getting a billet cylinder head, similar to one which has been made for tohatsus and had impressive results. I'm going to leave the ports standard and stick to fairly well tried and tested modifications.
|
|
|
|
|
22-01-2016, 07:41 PM
|
#17
|
|
Registered User
Country: Herne Bay
Location: Herne Bay
Boat name: El Rata
Boat make: Phantom 18
Engines: Mercury 115 Pro XS
Cruising area: Herne Bay
Join Date: Apr 2014
Location: Herne Bay
Posts: 37
|
I bought these on eBay. They're for DHLA delortto carbs. The hole needed widening by 1mm and the throat of the stack is 1mm bigger than the throat of the carb. I guess I could remove a bit of material from the throat of the carb to smooth the airflow but it's probably not going to make much difference.
|
|
|
|
|
22-01-2016, 08:20 PM
|
#18
|
|
Registered User
Location: West Coast of Norway
Occupation: naval architect
Interests: surface piercing props, stepped hulls, air entrapment hulls
Boat name: none
Boat make: PetterTintorera
Engines: Yamaha 90
Cruising area: West Coast of Norway
Join Date: Sep 2005
Location: West Coast of Norway
Posts: 888
|
Quote:
Originally Posted by chrome andy
I bought these on eBay. They're for DHLA delortto carbs. The hole needed widening by 1mm and the throat of the stack is 1mm bigger than the throat of the carb. I guess I could remove a bit of material from the throat of the carb to smooth the airflow but it's probably not going to make much difference.
|
Looks cool.
Did you test before and after?
Petter
|
|
|
|
|
22-01-2016, 08:58 PM
|
#19
|
|
Registered User
Country: Herne Bay
Location: Herne Bay
Boat name: El Rata
Boat make: Phantom 18
Engines: Mercury 115 Pro XS
Cruising area: Herne Bay
Join Date: Apr 2014
Location: Herne Bay
Posts: 37
|
Quote:
Originally Posted by Scand
Looks cool.
Did you test before and after?
Petter
|
Not tested yet. They come in just about any length or radius you can think of, so I'm sure someone could find the perfect solution. I just think they look good.
|
|
|
|
|
22-01-2016, 09:04 PM
|
#20
|
|
Registered User
Location: Scotland
Interests: Hole maker
Boat make: Humber Ocean Offshore
Engines: KAD 300/DPX
Join Date: Mar 2004
Location: Scotland
Posts: 958
|
Quote:
Originally Posted by chrome andy
....the throat of the stack is 1mm bigger than the throat of the carb. I guess I could remove a bit of material from the throat of the carb to smooth the airflow but it's probably not going to make much difference.
|
You may find that the ledge completely destroys the flow. A golden rule when flowing is to never have a forward facing edge. A long as possible blend taper may overcome the issue.
__________________
__________________
JW.
|
|
|
|
|
|
| Thread Tools |
|
|
| Display Modes |
 Linear Mode Linear Mode
|
 Posting Rules
|
You may not post new threads
You may not post replies
You may not post attachments
You may not edit your posts
HTML code is Off
|
|
|
|
 » Recent Threads
 |
|
|
|
|
|
|
|
|
|
|
|
|
|
|
|
|
|
|
|
|
|
|
|
|
|
|
|
|
|
|
|
|
|
|
|
|
|
|
|
|
|


